The ‘Oy’ of Cooking: 30 Days of Eating From Scratch
We’ve all heard an awful lot about The Joy of Cooking over the years — both the book, and also the fact that learning to cook for yourself can be amazingly creative and fulfilling. This idea is supported by pop culture every day — all you have to do is turn on the Food Network to feast your eyes on a smorgasbord of food fetishization.
But a 2009 Michael Pollan piece in the New York Times introduced me to a different side of cooking altogether. It started with a simple phrase that sounded an awful lot like a dare:
“Here’s my diet plan: Cook it yourself. That’s it. Eat anything you want — just as long as you’re willing to cook it yourself.”
In the summer of 2009, I embarked on a 30-day quest to eat only things that I cooked from scratch. And with that, I discovered what I like to call the “oy” of cooking.
Want potato chips? Get ready to slice up that potato, fry it, and season it. Craving pizza? Hope you have rennet lying around to curdle your mozzarella cheese. Thinking about topping off your meal with some chocolate? Well crack out the cocoa nibs and start grinding.
What follows is my adventure in cooking from scratch and all that I learned — including a much better understanding of food science, a deep respect and appreciation for everyday foods we take for granted, and the fact that I have an unnatural love for food puns.
Would I do it again? Sure, especially if I was on the lookout for the perfect diet. (Trust me — you’re less likely to plow through a pile of potato chips in one sitting if you spent 45 minutes making them).
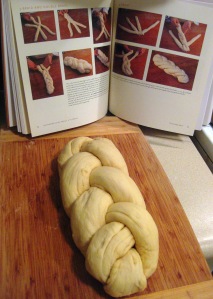
But beyond that, I realized that the point of putting myself through food bootcamp wasn’t just to write a blog. It was to learn and preserve techniques that have been perfected over generations (making a creamy yogurt, rolling out a perfectly round roti, or kneading a loaf of challah just right) — and even those that evolved more recently (sous-vide cooking, or learning to love the Kitchen Aid Stand Mixer).
When it comes to relying less on processed and packaged foods and moving to a sustainable and healthy way of eating, the journey continues every day — with lots of shortcuts (because, hey, there are only so many hours in a day), and for now, withtout the blogging. Happy reading!
Thanksgiving From Scratch: Viva Sous-Vide!
 It might seem a little strange to cook a 16-pound turkey just for fun a week before Thanksgiving – but sure enough, we did it anyway. In true Scratch Everything fashion, our mini Thanksgiving turned into a major food science experiment in the form of sous-vide cooking.
In Hot Water
Cooking sous-vide (french for “under vacuum”) involves vacuum-sealing food (or putting it in an air-tight bag) and immersing it in a hot bath of water to cook it at a low, controlled temperature so that the food maintains its integrity and comes out tasting moist and flavorful.
So how can one do this at home? Well, it’s complicated. First, you can’t just wing sous-vide cooking — you have to do your homework, because cooking at low temperatures can come with serious health risks if you don’t follow instructions. It’s also an expensive hobby when it comes to buying equipment.
One option is buying a thermal immersion circulator – but new ones start at $1,000 and buying it used can be a little iffy since they were originally designed as laboratory equipment … So Jeff invested in a cheaper option — a 40-cup rice cooker hooked up to an on-off temperature controller.
 Let’s Talk Turkey
To start, we bought a 16-pound turkey, which Jeff then butchered into manageable pieces that could fit into Ziploc freezer bags. He created a simple rub of fresh herbs and butter, and sealed the turkey portions with the seasonings into the bags, releasing any extra air. (He did the same with a mound of homemade stuffing.)
Jeff then placed them into a bath of hot water in the rice cooker, with the temperature being carefully controlled by the on-off controller. A few hours later, we had delicious, succulent turkey. But because you’re slow-cooking the meat and stuffing, it might come out looking a little lackluster. Just brown the meat lightly in the oven or an a pan, and voila! You’ve got Thanksgiving dinner.
Alright, I guess this isn’t a method that most of you are likely to try anytime soon … but when you get down to it, is it really any less absurd than deep frying an entire turkey? At the end of the day, I’m just thankful that I’m lucky enough to have access to delicious, healthy food every day of the year. Happy Thanksgiving!
Kebabs From Scratch: Not for the Faint of Heart
Meat on a stick is a valued dish across the globe, from shwarma to corn dogs. But the king of all meats on a stick is unquestionably the kebab. With its diverse origins and countless recipe variants, there’s a kebab for every culture.
During my one month of eating from scratch, I had mastered the simplest of kebabs — that is, skewering and grilling whole chunks of meat and/or veggies on a stick. But now that I have more time on my hands (since I’m not busy churning butter and curdling cheese), Jeff and I decided to take on a more complex kebab by (*gasp*) grinding our own meat.
Dump ‘n Grind
I like to consider myself a kebab connoisseur. In fact, my childhood was one big kebab taste test, featuring samples from my mom’s kitchen and the not-so-fancy but extremely delicious South Asian restaurants near our house in New Jersey. To this day, my favorite kebab is the seekh kebab, a.k.a. reshmi (or silken) kebab, which is made of spiced ground meat roasted on a skewer.
In our effort to replicate the “Is someone putting crack in these?” feeling we get from the New Jersey seekh kebabs, Jeff and I decided it was imperative to grind our own meat — using chicken breasts from an organic chicken that Jeff carved himself. Sure, it wasn’t my favorite thing in the world … but it’s way less gross than not knowing where your ground meat comes from.
You Gotta Know How to Roll ‘Em
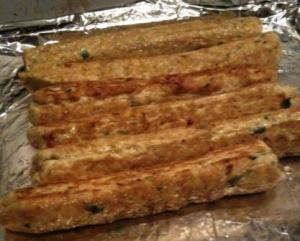
It turns out rolling a kebab is an art. While we’d spiced our ground meat perfectly (with onions, garlic, ginger, cilantro, turmeric, cumin, chili powder, and more), our mixture was too mushy to form around skewers … so much for meat on a stick. We worked around the problem by searing our kebabs in a cast iron skillet before popping them in the oven at 375F for 8-10 minutes.
In order to produce perfectly rolled kebabs, Jeff put the chicken mixture in a plastic bag and squeezed out little logs onto the skillet — kind of like using a pastry bag to decorate a cake. If you’re making the kebabs correctly, they should look, well, kind of unappetizing in their raw form … just maybe not as gross as watching chicken shoot out of the meat grinder on the stand mixer.
Our mushy mixture was a serendipitous mistake, though. We ended up with perfectly browned kebabs that were tender, mouth-watering, and beautifully spiced. It seems searing them before roasting actually sealed in the juices. And the best part is, we were smart enough to make a huge batch we could freeze. Kebabs all around! Now that’s something to be thankful for.
Cooking From Scratch: Uh-Oh, Spaghetti Woes

The indispensible pasta rack
Making pasta from scratch is a little like being a mad scientist — there’s a lot of room for experimentation, you get to play with cool equipment, and you’re guaranteed to make a mess (which, of course, is half the fun).
Friends Don’t Let Friends Make Pasta Without Friends
So, Jeff and I got invited to a friend’s house to make pasta from scratch, and we’d been looking forward to it for weeks (yes, it is that exciting). I had visions of rolling out the pasta by hand (I grew up in an Italian town in Jersey … that’s how people made pasta), but boy was I ignorant to new pasta-making technologies.
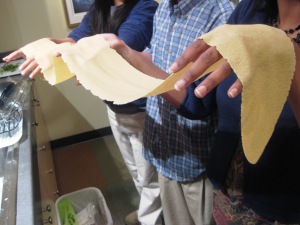
That's some noodle!
Here was our process (complete with tips, lessons learned, and questions left unanswered):
1.) Dough! – Hannah (Jeff’s friend who actually knew what she was doing) mixed a pasta dough that was a combination of semolina and whole wheat flour. (For the record, she usually uses white flour). It was delicious, and it yielded a pasta that was a little more al dente … but we also needed to add a little more water as we were kneading (because of the whole wheat flour) to get the right consistency. Tip: Don’t skimp on the kneading. You want a smooth, firm, and dry dough — not too sticky!
2.) Feeding (and re-feeding) the Kitchen Aid pasta monster – The Kitchen Aid stand mixer is the coolest piece of kitchen machinery I’ve ever used — especially the pasta attachment. All you have to do is feed your firmly-kneaded dough through the roller a few times at decreasing thickness until you get long, smooth sheets of pasta like the one in the picture. The stand mixer will even do the thin cutting for you. Tip: If it’s crumbly, roll it into a ball and feed it through again. You can also do it the old-fashioned way, which is a much better workout.
3.) Racking it up – If I had to pinpoint the one woeful experience of our pasta-making, it was how hard it was to catch the pasta as it went through the stand mixer. We lost some fettuccine to the kitchen floor, and you really did need someone helping you grab the pasta and putting it on the drying rack. Tip: If you run out of room on your rack, use coat hangers. Also, remember that fresh pasta cooks much faster than the stuff in a box!
4.) Getting sauced – If you’ve got an amazing vehicle of flavor like homemade pasta, why make just one sauce? In true “Scratch Everything” fashion (or maybe it’s just called gluttony), we made two sauces — an easy clam sauce recipe that Hannah found in the Seattle Times, and a relatively quick puttanesca sauce a la Rachael Ray. Fun Factoid: The origins of pasta puttanesca are disputed, but the name is derived from the Italian word for “whore.” Hmmm….
5.) Mangia! – The reason why friends don’t let friends make pasta without friends is partially because the process is so much fun, and you need at least one extra pair of hands to help out… But if you’re going through so much effort, you might as well make a big batch to share with friends. You know what that means? Leftovers … although we’re still trying to figure out how best to store fresh pasta. (Apparently, freezing it or drying it out is the way to go … oops, something to try next time!)
Until then, buon appetito!
Cooking From Scratch: Foods I’ll Never Buy Again

Piece of cake ... strawberry shortcake
I know — you’re never supposed to say never, and there’s a chance I’ll eat my words. But this cooking from scratch experiment taught me about certain foods that I’ll probably always buy readymade, and other foods that I’ll *probably* never buy again. Strong words, eh?
Well, instead of dwelling on the foods I lusted after (and couldn’t make at an even reasonably edible level), let’s look at some of my big, sustainable successes in the form of foods I hope to never find on my grocery bill from here on out:
1.) Ready-Made Biscuit & Shortcake Dough: Don’t get me wrong; I think the Pillsbury doughboy is freaking adorable — I just don’t want him making my biscuits (hm, that sounds like a euphemism…) But seriously, biscuits and shortcakes are so easy, you might as well make them from scratch — especially when you can enjoy them with homemade butter.

Breakfast in the fuzzy logic rice cooker
2.) Instant Oatmeal: Again, I have nothing against the Quaker Oats man — he seems like a standup guy. But after discovering the wholesome goodness of steel cut oats, I’m afriad there’s no going back to instant oatmeal for me. Steel cut oats might rank a notch lower in terms of convenience, but my handy dandy rice cooker does so much work, it hardly counts as “cooking.”
3.) Whipped Cream: Okay, I admit it — you can’t squeeze homemade whipped cream directly into your mouth like you could with a can of ReddiWip. And sure, it’s not as convenient as picking up a container of Cool Whip. But whipping your own cream isn’t just easy and ridiculously delicious — it’s also bizarrely fun, especially if you separate some out and turn the rest into butter. Mmmm.
4.) Pasta Sauce in a Jar: Sadly, Seattle’s amazing tomato season this year is coming to a close. (It still couldn’t rival Jersey Fresh tomatoes, though). And no, I didn’t freeze or can fresh tomatoes to get me through the winter, although I really wish I had… But that doesn’t mean I can’t make my own sauces using canned whole tomatoes — they yield a surprisingly fresh-tasting, chunky homemade sauce that would do Jersey proud.
Finally, here are some of my honorable mentions: butter, humms, and yogurt — I’ll definitely make these way more often, but I can’t say I’ll never buy them again… I should also give a shout-out to salad dressing, because I haven’t bought a bottle of it for years. I guess my track records shows that I probably won’t end up eating my words — but if I do, here’s hoping they’re delicious.
Hungry Eyes: Foods I Lusted After Like Crazy

I know, I have an addiction...
This may come as a surprise, but it turns out I’m no saint (*gasp*). I know, I know … it’s sort of like finding out there’s no Santa Claus (um, I hope no children are reading this). So where exactly am I going with this?
Well, during my 30 days of cooking from scratch, people kept telling me they could never do what I was doing. So I feel like I need to confess that this wasn’t exactly a piece of cake for me. There was more than one chocolate meltdown, and a few sushi cravings that almost turned violent.
So just to make it clear that this wasn’t a walk in the park, here’s a look at the foods that were my Kryptonite through the course of this experiment:
1.) Chocolate – I didn’t just crave chocolate — I had full-on chocolate meltdowns (I’d like to say I feel guilty, but I don’t…). I had every intention of making chocolate from scratch, until I realized this entailed finding cacao beans, roasting them, and grounding them into liqueur. Sure makes you appreciate a bar of chocolate.
2.) Cheese – It turns out there’s no substitute for good old-fashioned cheese making. Outside of my success making paneer, my adventures in cheese making were total, flavorless disasters. It turns out the flavor comes from aging, and there’s no bypassing nature. That’s not to say I don’t intend on trying cheese making again — but this time around, I’ll manage my expectations.
3.) Bread/Sandwiches – I want to start out by saying that my perfectly golden-brown loaf of challah was one of my biggest successes of this experiment. It was also promptly followed by one of my biggest failures — my dough anvil that was supposed to be a loaf of crusty bread. It turns out bread making is an art and a science — you can’t really take shortcuts, no matter how you slice it.
4.) Pasta/Noodles – Never fear — this one’s on the list for a future cooking from scratch experiment. But when you’re cooking every single meal from scratch, it’s hard to find the time to make pasta or hand-pulled noodles. It also requires quite a bit of space, which can be tough in a small urban apartment. But don’t worry — that won’t stop me from trying. Dare I call this proejct Pasta La Vista, Baby?
5.) Sushi – There are plenty of people who make their own sushi. My friend Phelps gave me a detailed tutorial in how to prepare sushi rice, and Jeff explained to me how to pick out and cut fresh fish. But I never seemed to have enough time during the madness of the 30-day experiment to devote time to sushi-making. (Making sushi isn’t exactly the kind of project where you want to cut corners).
In the end, I realized that it was excruciatingly difficult to find time to embark on more complex food-from-scratch projects when I was constantly mired in cooking everything from scratch. But now that I’ve got some breathing room, well, expect the unexpected.
I’d like to end with a moment of silence in honor of Patrick Swayze (hence the title of this blog post). This is one Jersey Girl who will always be crazy about Swayze.
Cooking From Scratch: Save Some Serious Dough

No, not that kind of dough...
Ah, friends. It’s been quite a journey. And so it ends, 30 days of cooking from scratch, ending momentously on my 28th birthday. But wait … there’s more!
Now begins the fun part — figuring out what I learned … what was worth it, what I’ll continue to do, and what was, well, kind of stupid. Hindsight is 20/20, after all. So let’s begin by talking dough.
The Sweet Taste of Money
Once a month, I get cranky and depressed … when I get my credit card bill, that is. A few happy hours here, a couple sushi dinners there, and next thing you know you’re signing away your first born to Citibank.
But lo and behold, my monthly bill was $300 cheaper than my average this time. (Figure 8 dinners for $20 each including tip, 5 lunches for around $8 a pop, a brunch a weekend for $15 each, and a few happy hours, and that’s $300).
When I first told my brother about all the money I’d saved, he was skeptical. He found it tough to believe that you could cook for less than $3-5 a person per meal — the cost of a decent bowl of pho. As it turns, out he’s right … and wrong. How can that be? Well, here’s what I found out about saving money when you’re cooking from scratch:
- Setting up a functional kitchen can be expensive … at first. The actual cost of making an apple pie isn’t that high. But if you need to buy a pie pan, a rolling pin, flour, and sugar, it starts to feel like you might be better off just getting a McDonald’s apple pie (until you actually eat it …) The point is, once you get past the initial cost of set up, that’s when you start to see the real savings from cooking at home.
- There isn’t a huge difference between a grocery bill for 2 versus 4. Through the course of this experiment, I cooked a lot of meals with and for friends. But surprisingly, my expenditure on groceries didn’t increase twofold. Cooking for 1 feels expensive because of the nature of shopping for food … you inevitably end up cooking for 2-4.
- There’s less time for happy hour when you’re cooking every night. I can admit I’ve got an expensive habit … happy hour. It’s not so much the drinks as it is the lovely happy hour menus. I’m a sucker for them, what can I say? But with cooking dinner every night, who has time for happy hour? And that means money in the bank.
- Even if you’re using premium ingredients, cooking in bulk saves money long-term. When I’m at the farmers market, I forget the difference between want and need … like the time I almost bought 12 kinds of chili peppers. While cooking in bulk might increase your current grocery bill, it’ll reduce how much you spend on food in a month.
With that, I’ll stop talking about dough so I can start thinking about batter … cake batter, that is. After all, what else is there to think about on your birthday?
Freshly Picked Plums, in the Kitchen, With a Cobbler

A fragrant plum cobbler
If you think the title of this post sounds vaguely like the end of a game of Clue, well, you’re right. So why would I reference a murder mystery game when I’m writing about plum cobbler? Well, because I somehow managed to convince myself that the plums might kill me, obviously…
See, when I first moved to Seattle, I was horrified to find that people would just pick blackberries off the bushes on the city sidewalks and pop them into their mouths. In New York, you NEVER (and I mean never) eat anything you find on the sidewalk.
So when I found out that Jeff had a beautiful plum tree on his patio, I was cautiously excited. Visions of sugar plums and home-dried prunes danced in my head … but I couldn’t shake a feeling of apprehension around eating anything that I picked myself.
The Fruits of My Labor
Rather than let the plums go to waste, I decided it was time to confront the tree head-on. The first thing I learned is that fruit trees are A LOT of work … especially when half-rotten fruit starts to fall to the ground, attracting flies and birds. After spending a good hour sweeping plums from the patio, I got to work picking fresh ones. I felt oddly satisfied (Look at me! Jersey girl picking plums!) until the neighbor came by and asked me if the plums were safe to eat. Hm.
Now, I’ve never heard of a poison plum. But did I really want to take chances? My deductive reasoning suggested they were safe … the patio was covered in seeds, left behind by the birds (who clearly weren’t dead). I did some research and found that the Early Italian Prune Tree thrives in Seattle, yielding fruit in early September. I got confirmation when I took the fruit to my local co-op, where I learned that my plum was in fact the Italian prune they were selling for $2.99 a pound. Score!
In an hour, I must’ve picked fruit off of 1/8 of the tree … several pounds worth of fruit, and not even a dent in the number of plums on the tree. So what’s a gal to do with a bounty of prunes, or any fresh fruit? Well, here’s my plan:

Like jewels...
1.) Eat them fresh — and if you can’t eat them all, give them to friends and local food banks that accept fresh produce. Prunes aren’t just for old people!
2.) Make fruit desserts, like plum cobbler, plum tarts, or plum pudding. People don’t cook with plums enough anymore — these desserts are tastier than you could ever imagine, and ridiculously aromatic.
3.) Dehydrate them. Prunes are a delicious, healthy snack and they’re great in stuffings and tagines. You can also can or freeze homemade fruit chutneys, compotes, and preserves that’ll make great holiday gifts.
Just call me the Indian American Martha Stewart. But for now, I’m plum out of ideas. Happy eating!
Roast Chicken: All Trussed Up With No Place to Go
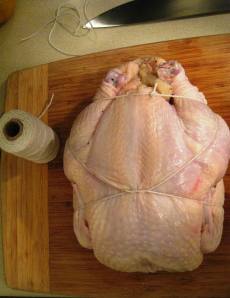
My very first trussed chicken
Call me chicken, but I’m one of those omnivores who’s secretly grossed out by cooking meat. I tend to buy my meat in abstract forms — cold cuts, boneless pieces, and ground chuck (I draw the line at Spam).
I never thought much of it until a friend told me that his little sister cried when she realized that chicken you buy at the grocery store is the same thing as chicken the animal. I guess it’s easy to forget where your meat comes from when you buy it in neatly trimmed, plastic-wrapped portions.
Trussed for the Very First Time
So, I decided it was time to overcome my hypocrisy … with the help of a roast chicken. (Baby steps, okay?) I opened up Thomas Keller’s Bouchon cookbook to a simple roast chicken recipe, and immediately felt disgusted, exhilarated, and slightly nervous. The first thought that passed through my mind was, “You want me to stick my hand WHERE?!”
But in the end, I was left with a perfectly crispy, golden-brown roast bird — and a, uh, deeper knowledge of the chicken itself. So here’s some of my learned wisdom for the rest of you omnivores who might need to get back in touch with your inner animal:
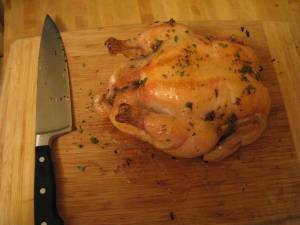
Perfectly golden brown
1.) Making roast chicken is kind of gross. You have to stick your hand in the chicken’s cavity, there are often remnants of feathers on the bird, and the sound of cutting through bone is likely to make you cringe. But it’s easy, economical, and healthy.
2.) Trussing the bird (tying up the wings and drumsticks with twine) makes for a moister chicken. It looks hard at first, but if you follow directions properly, you’ll find it leaves you with a prettier and tastier dish.
3.) Don’t overdress your bird. We have a tendency to dress up our food and give it fancy names to forget the fact that we’re animals. But for chicken, all you need to do is dry it thoroughly and add enough salt so that the skin gets golden brown and crispy.
I can’t tell you how many times I yelled, “Ew!” or mentioned to Jon and Jeff how gross it was to have my hand in a chicken cavity. But trust me, I see the irony in being disgusted by the raw bird, but salivating over the finished roast chicken when it’s served with spinach, biscuits, and mustard (yum). We’re just complicated creatures, I guess.
Combo Italiano: Everyday Italian … Without Pasta

Who needs pasta?
If you think this blog post is just going to be a litany of New Jersey-isms, well fuhgeddaboudit.
Still, growing up in Jersey, you can’t help but pick up a few things about Italian food… like the fact that there’s more to the cuisine than pasta. That’s not to say that making fresh pasta isn’t a real art… in fact, I’d like to try it myself. But tonight, I want to devote my attention to pasta’s less popular but equally gifted step-sibling — polenta.
Move Over, Giada
Okay, you got me — I’m not Italian. For all I know, I might constantly break all the cardinal rules of la cucina italiana. But I can tell you one thing with certainty. Tonight, Jon, Jeff, and I whipped up a fantastic everyday Italian meal from start to finish in about an hour — and it was freaking delicious.
The menu consisted of three basic items — meatballs, tomato sauce, and polenta. The meatballs were pretty straightforward, although I added some orange zest to them just for kicks. For the tomato sauce, we turned to Jacques Pepin’s “Complete Techniques” for guidance on peeling and seeding the tomatoes. This was actually the most time-intensive and important step — which is why I made Jon and Jeff do it.

Like mashed potatoes...
Presto Polenta!
The biggest surprise of the evening was the simplest dish of all — the polenta. I’ve often been awed by the mashed potato consistency of creamy polenta, and the crispiness of grilled polenta cakes (I’m easily impressed…)
Well, it turns out polenta is just corn meal, slowly stirred in boiling water, with salt and butter. Granted, it took a lot of stirring to get it creamy (I pawned the task off on Jeff after about 10 minutes), but the result was a hearty side dish that soaked up the flavors of the tomato sauce beautifully. Let the polenta cool, and you can grill it after it congeals to make a polenta cake. Divine.
So next time you go to open up a box of pasta, a jar of sauce, or a can of SpaghettiOs, I urge you to consider making your own sauce (even if it’s with a can of crushed tomatoes) and experimenting with polenta. It’s the ultimate combo Italiano. Like me (an earnest but clumsy chef), you just might find that creating entire meals from scratch is easier than you’d imagined. Buon apetito!
